Many external intervalometers insist in half pressing the shutter to trigger the autofocus before each shot. This often blocks the camera for a couple of seconds. During this time you won’t see a preview, emptying the buffer will be delayed and you won’t be able to control the camera externally. Today I’ll show you how to tweak any intervalometer easily in order to get better performance for time lapse shooting – especially with short intervals and when shooting the holy grail.
The Problem
Most intervalometers are obviously rather build for photography then time lapse, since they waste precious seconds triggering the autofocus signal on the camera before actually releasing the shutter. And this, despite of the fact that the autofocus normally will be off when shooting time lapse anyway.
During this time the camera will be idle, turn off any image preview, delay writing the card and thus prevent very short intervals and additionally cannot be controlled externally via USB.
In my time lapse lessons often those participants that bought the expensive original intervalometers from Canon or Nikon suffer the most from this behavior. Especially when the shutter times get longer while shooting the Holy Grail, they notice, that even a couple of seconds “dark time” (the difference between interval and shutter) are not enough to display a preview on the camera because as soon as the autofocus signal gets triggered, the screen will go blank. And it gets even worse, when shooting the holy grail with qDslrDashboard. The half pressed shutter blocks the communication between tablet and camera, often stopping the whole process of ramping.
Those are the similar disadvantages that you experience, when using the internal intervalometer on Nikon cameras: it too blocks the camera for an unnecessarily long time, that’s why I don’t recommend using it for holy grail shooting.
To make it clear: all this happens, despite of the fact, that the autofocus is turned of at the camera and/or lens!
How do you know the behavior of your intervalometer
Just check your camera display when pressing the shutter half way. On Nikon for example, you’ll see “r15” on the bottom right of the shoulder display. This indicates the remaining buffer and will be displayed when the camera receives the AF-Signal.
Now connect your intervalometer and set it to a 2 second interval, use a short shutter time. Check the shoulder display – with a Nikon, the time that you see the “rXX” display will be lit as long as the AF-signal is being sent to the camera – this is the time where the camera will be somehow blocked as described above.
Check out this short video, where I made a direct comparison between a 2 second interval shooting with my Pixel timer (and that’s the “good one”) first with the original cable and then with the hacked one:
https://www.youtube.com/watch?v=WKjjN2-1Ti0
I don’t know about Canon, since I don’t have one here, but I assume the display might change as well, indicating when the camera gets the AF-signal to enable you to judge the time it takes. But even if not – just go ahead – every intervalometer will take profit of the modification described below for time lapse shooting.
Buy the right intervalometer
One of the few exceptions is the Pixel TC-252 intervalometer, it’s the one with the shortest autofocus triggering that I know, and it’s mostly okay – but even this can be improved, as you could see in my video.
If you already have bought an other intervalometer, with a long AF-trigger time, don’t worry, it’s a rather easy task to modify it, in order to completely get rid of the autofocus signal.
…or modify the cable of your intervalometer
Although I don’t see much risk in doing those modifications, especially if you use a spare cable, please remember, that you do this at your own risk!
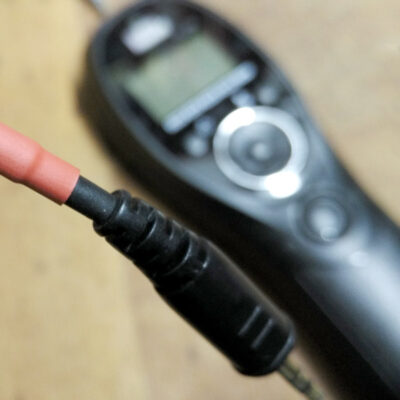
Intervalometer with fixed cable
If you have an intervalometer with a fixed cable, it would be a nice idea to make it removable when doing this modification, just by soldering a 2.5mm female jack to it, for example just by cutting it from this adapter. This would allow you to connect any standard release cable (see below) afterwards. You could then decide, if you would like to add the following modification to the intervalometer itself when attaching the female jack (in this case the autofocus will always be disabled) or if you would like to modify the connecting cable as I will explain in the following, then you could always opt to switch to an unmodified cable, whenever you would like to use autofocus for other purposes then time lapse.
Intervalometer with removable cable
If you have an intervalometer with a removable cable, I’d suggest to just get another one of those cables to make the modifications on it. The cables usually have a 2.5mm micro phone jack on the one side and the proprietary camera connector on the other side and are rather cheap.
For the Nikons D750, D6x0, D7x00, D5x00, D3x00 for example it would be this cable. For many Canons it would be this cable.
The 2.5mm micro phone jack has the following pin assignment:
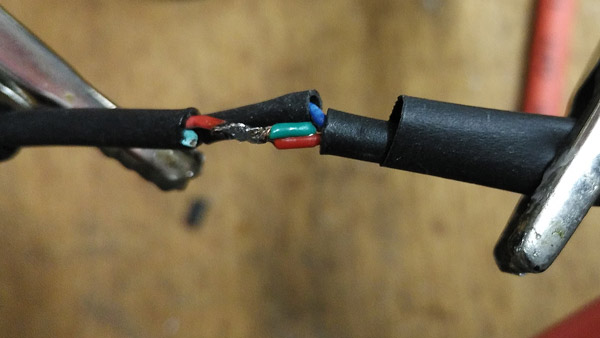
Now the whole trick is to get rid of the half press focus signal. If you look at the 2.5 micro jack, it has 3 contacts: the tip is for the release signal, the middle contact for the autofocus and the inner one is ground.
Since the colors of the inner wires are nor standardized, your best option is to cut the whole cord somewhere and then use an continuity tester to find out, which color is related to which contact.
For my cable, blue was ground, green focus and red the release. But like I said, please don’t take this for granted, it might vary for your cable.
Now we have slightly different approaches, depending on whether you are shooting on Canon or Nikon.
Canon Shooters
Now for canon cameras it’s easiest: join the release signal by soldering the ends together, put a shrinking tube over the solder joint. Now cut the autofocus signal cables very short at each end, so that they don’t connect, then solder the ground cables and put a shrinking tube over the whole joint. You are done!
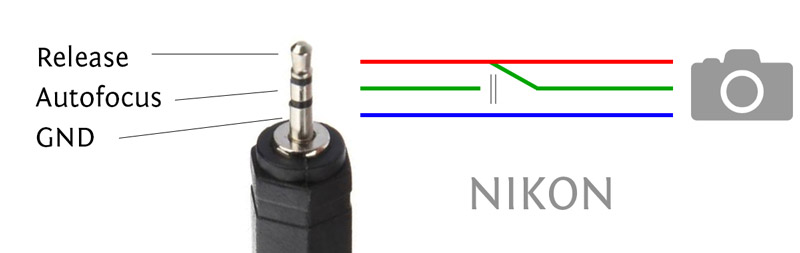
Nikon Shooters
Unfortunately Nikons won’t release, if they don’t get any autofocus signal. That’s why for Nikon we are going to join the release and autofocus wire on the side of the camera by twisting them together, then put some solder on the twist, to fix it. Then solder this with the release signal coming from the intervalometer. Cut the focus cable short on the other side. Seal with shrinking tube. Solder the ground cables together. Seal everything with shrinking tube.
This way the autofocus signal from the intervalometer will do nothing anymore. The release signal from the intervalometer will trigger the autofocus and shutter release on the camera at once, enabling the Nikon to release without prefocussing.
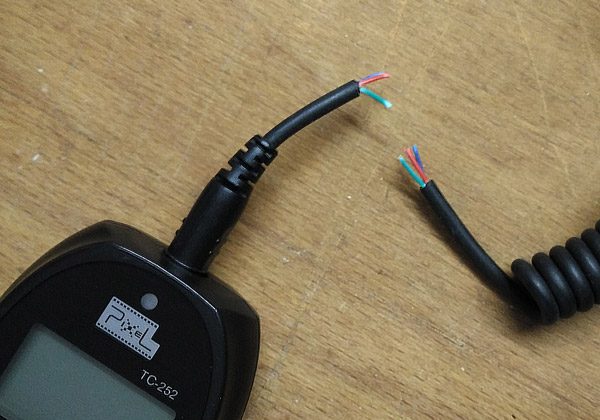
On Nikon, focus and shutter are being released simultaneously. Here I connected and put the shrinking tube on the ground cable first, then soldered the others.
You don’t need autofocus at all when shooting time lapse and this hack eliminates the delay caused by the autofocus trigger.
Removing the autofocus signal from the equation when shooting time lapse has many advantages:
You will be able to shoot the holy grail will much shorter dark times.
When using the camera preview, it will be visible for a longer time or even visible at all when using short intervals
When shooting northern lights or other subjects that require very short intervals, this technique will help a lot too, since the buffer will not fill up so quickly
The camera battery will probably last a big longer
LRTimelapse 6.1 is ready for download! Hey guys, LRTimelapse 6.1 is out and I'm really excited about the new version. There are a couple of new features, improvements and fixes.…
Northern Skies 4K (Cello Version, 2024) This is an update of my Film Northern Skies where the Cello in the Music track was played by Georg Roither, a professional cellist…
Internal Workflow In LRTimelapse 6 you can do a simple, all internal workflow. This is not meant to replace the Workflow with Lightroom, it should rather…
 Most intervalometers are obviously rather build for photography then time lapse, since they waste precious seconds triggering the autofocus signal on the camera before actually releasing the shutter. And this, despite of the fact that the autofocus normally will be off when shooting time lapse anyway.
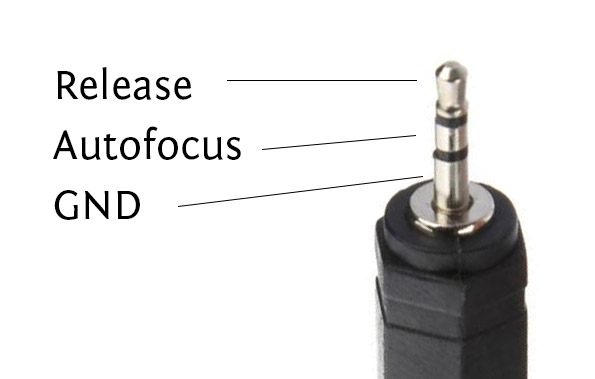


")