This is the “Swiss Army Knife” in LRTimelapse. It works for any RAW sequence, holy Grail or not. This is the workflow that you will be using, if you shoot RAW (you should). Holy Grail sequences will automatically be detected by evaluating the exif-data.
The Visual Workflow offers Holy Grail leveling, visual previews and visual deflicker.
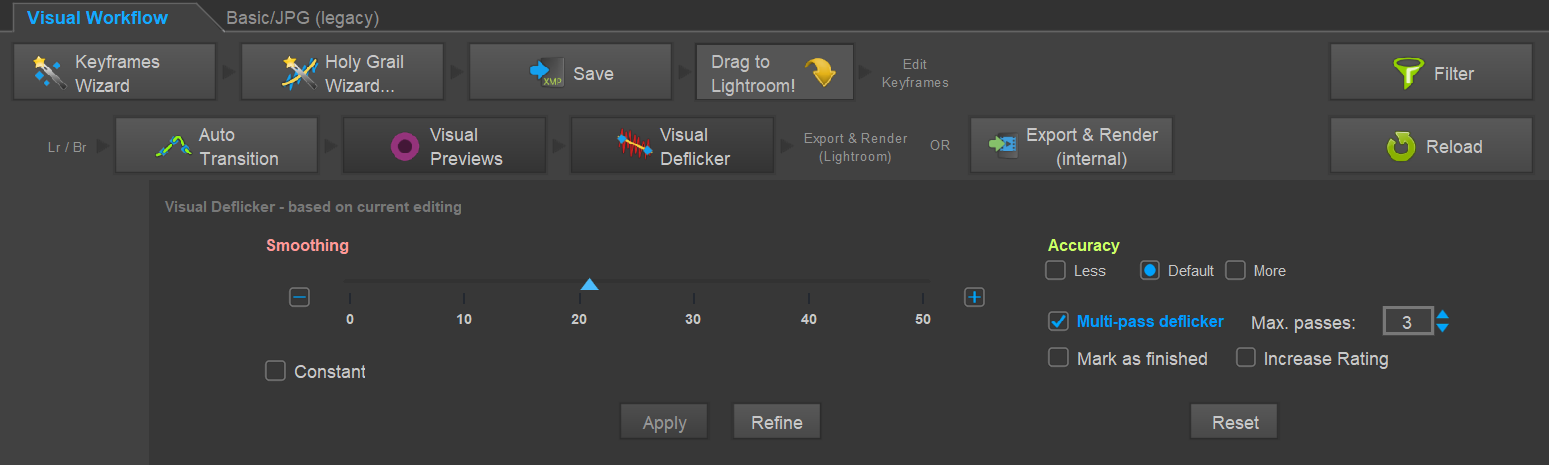
Visual Workflow
JPG/TIFF/PNG sequences can be used, if you convert them to DNG with Lightroom first.
On Mac it will be always the CMD Key instead of Ctrl.

- Load your Sequence by choosing a folder on the left. Wait until the sequence has been loaded.
- Launch the Keyframes Wizard, it will automatically create some keyframes based on an automatic analysis of the luminance progression. By dragging the slider you can easily create more or less keyframes. Keyframes will mark the images, that you are going to edit manually – the develop-settings for all other images will be calculated automatically by LRTimelapse.
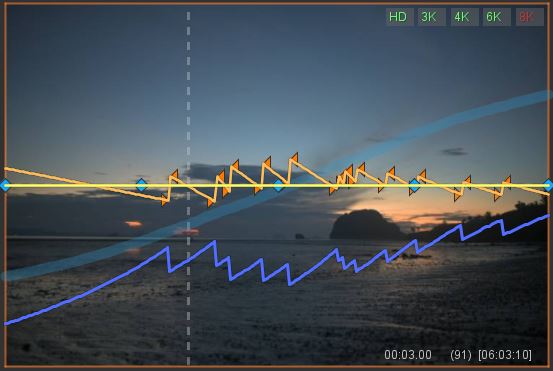
Note: for Sequences shot with the “Holy Grail” approach, the wizard will create two orange triangular keyframes for each change in ISO, Shutter-Speed or Aperture. Those are for internal use only. - Sequences shot with the “Holy Grail” approach:
- The Holy Grail Wizard button will be enabled, just click it and an orange curve will get calculated to compensate the Holy Grail camera adjustments.
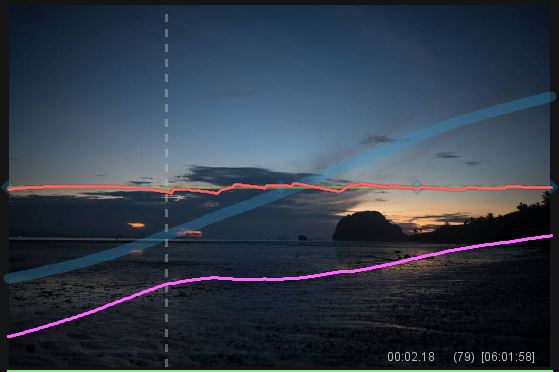
The orange curve shows the compensations that the Holy Grail Wizard calculated for the camera adjustments.
- Use the Rotate/Stretch sliders to rotate the orange curve in order to get it as close to the horizontal middle line as possible. If you want, for a sunset you can let it fall a bit and for a sunrise you can let it raise a bit. The thick cyan curve gives you an idea about the natural luminance transition. This is also explained in the Holy Grail Tutorial.
- The Holy Grail Wizard button will be enabled, just click it and an orange curve will get calculated to compensate the Holy Grail camera adjustments.
- For all sequences: Save
- Bring your sequence to Lightroom and make sure the XMP-Metadata that LRTimelapse wrote gets applied.
There are to scenarios to make sure this happens:- If you imported with the LRTimelapse-Importer (the sequence is not yet in the Lightroom catalog):
- Drag the button named Drag to Lightroom into the Lightroom Library. This will invoke the Lightroom importer. Here is a video tutorial on how the drag/drop works.
- Make sure that Add is selected at the top (not copy!!) to add the images to the Library.
- If you imported with Lightroom (the sequence has already been added to the Lightroom Catalog):
Either remove the sequence from Lightroom and proceed like described on A (recommended). Or:- Go to Grid-View (G),
- make sure the Filter is set to LRT Full Sequence.
- Select all images (Ctrl-A) and then
- select Metadata->Read Metadata from Files from the menu.
You can speed up the reading process by setting the Filter to “Speed up LR!”.
Select the right filter in Lightroom’s filter chooser above the filmstrip. If you don’t see the filter panel, just click on “Filter”.
- If you imported with the LRTimelapse-Importer (the sequence is not yet in the Lightroom catalog):
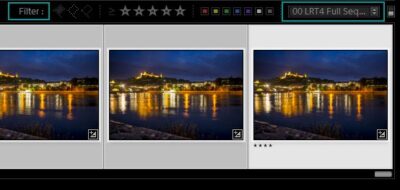
- Select the filter LRT Keyframes to see only the keyframes.
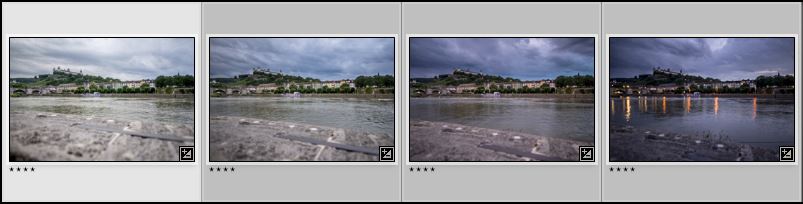
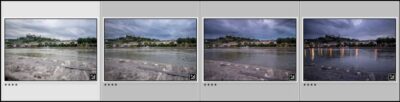
- Now your sequence is in Lightroom and you should see the keyframes that you created in LRTimelapse as ****-Ratings.
- Edit those keyframes from left to right. If you are finished with one, select it, then Shift-Select the last Keyframe like this:
The left keyframe is the “most selected” – you’ll sync it’s settings to the other keyframes with the “LRTimelapse Sync Keyframes”-script.
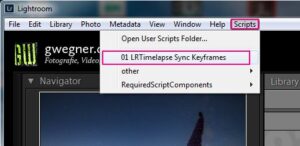
Windows
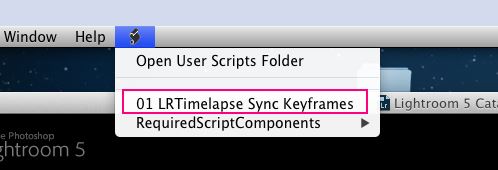
The current keyframe will then be “most selected”, the others selected a bit darker. Now launch “LRTimelapse Sync Keyframes” from the Lightroom Scripts-menu – this will apply the settings from the first keyframe to all others.
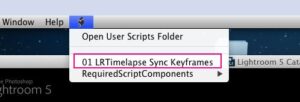
Mac
Advanced tip: please do not use copy/paste or the native synchronize in Lightroom at least not, if you include Gradients/Masks. In the Expert Tips Tutorial #7 I explain how to do more sophistiated syncing.
- Switch to the next Keyframe and make your changes in editing, if needed. You can change any tools you want (with few exceptions).
If you work with Masks (Gradients), please don’t create new ones – always use the predefined Masks that LRTimelapse created. And please don’t delete Masks! - Edit all keyframes like this. After each one, select the current one, then shift select the last one and launch the LRTimelapse Sync Keyframes script. (always shift-selecting to the last KF and not only the next has the advantage, that you can easily skip keyframes from editing, if they are already fine with the last settings.)
- Now save the changes: make sure, that again (like always when working with metadata) you are in Grid View (G), all keyframes are selected (Ctrl-A) and then use Metadata->Save Metadata to Files from the menu or Ctrl-S.
- Go Back to LRTimelapse and proceed with the second row of workflow buttons.
- Auto-Transition reloads the metadata for the keyframes and calculates the transitions for all images in between the keyframes. It will give you a short glimpse on all curves calculated in the preview, you might permanently turn on the display of all curves by clicking on “ALL” on the top right of the preview.
- The Visual Previews will now allow you to actually see the sequence with all edits applied! This is not only great to get a quick preview, it as well allows you do apply a deflicker based on the appearance of the developed images! Click on Visual Previews and LRTimelapse will start to develop your images. You’ll get a pink curve that reflects the luminance after all develop settings have been applied (including the Holy Grail corrections etc…).
- After all previews have been developed, have a look on the pink curve. Is it as smooth as you would have expected?
There might be a couple of reasons for a curve that is not so smooth at all:- Strong edits in Lightroom,
- Inaccurate real Exposure/Aperture/ISO in comparison to the Exif-Data that the camera writes,
- Natural changes in brightness
- Flicker, etc. etc.

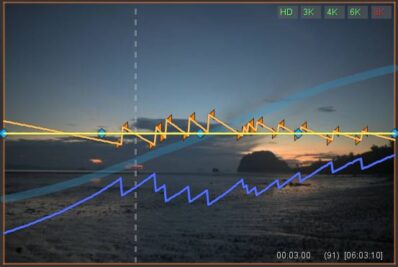
You can see that the Holy Grail Wizard alone in this case is not sufficient to create a really smooth visual luminance curve after all developments have been applied.
- Now you can just activate the Visual Deflicker:
 Drag the Smoothing slider until the green smoothed curve looks like you would like the pink curve to be. In order to learn about the new Multipass-Deflicker, check out my Basic Tutorial. Leave it off for now.
 - Click on Apply
- Now you can:
- Either wait until the visual previews have been renewed to see, if the pink curve looks as smooth as you would like to have it after the deflicker has been rendered. If not, you can click on Visual Deflicker again, adjust the smoothing-curve and then click on Refine to apply deflicker again. You can do this as often as you want, but mostly once is enough, sometimes you might have to do it twice. Please note that depending on your sequence, a silky smooth curve is not always the best (because you would level out natural brightness changes). In those cases you might have to set a reference area by clicking and dragging into the preview to isolate only a certain area of the image as reference for the calculation of the luminance curve I’ve explained this in the basic workflow.
- Or – if you don’t want to wait until the Visual Previews have been generated again – just turn off the Visual Previews (this will stop them from being created and save processor load). The metadata with the changes is already saved and thus you can already take them over to Lightoom. So: switch to Lightroom, read the metadata for the whole sequence (Grid-View, Filter: LRT Full-Sequence, Read Metadata from Files) and export via the LRTExport plugin.
Again, you can speed up the Reading process by selecting the filter Speed up LR!.
The visual deflicker will be applied, even if you didn’t wait for the visual previews to render this time.
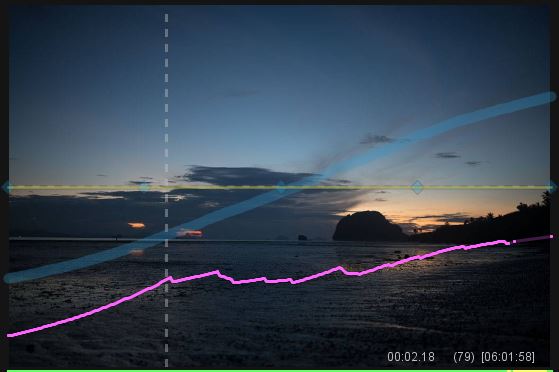
- This is how the pink curve looks after visual deflicker:

After applying the visual deflicker, the luminance curve of the developed images is really smooth, there are no residual flicker effects left in this sequence. It’s ready to get rendered!
- Set the filter back to LRT – Full Sequence.
- Select the Full Sequence (Ctrl-A) and do “Metadata / Read Metadata from Files“. This will bring all edits to Lightroom.
- Rendering will be explained in the Export and Render Instructions.